

An airbrush kit is almost always sold on the airbrush, and that is the wrong half of the box to study. The gun itself is a simple thing, a tapered needle sliding inside a matching nozzle, and even a modest one lays down a fine line when it is fed properly. What decides whether a first session ends in smooth colour or in spitting, spidering paint is the compressor behind it: whether it stores air in a tank, how long it can run before heat stops it, and whether the pressure arriving at the trigger is flat or arriving in pulses. Our top pick is the Master Airbrush Cool Runner II kit for pairing a continuously cooled compressor with three airbrushes that cover both feed types. This shortlist of 7 airbrush kit for beginners options is judged on the compressor first and the gun second.
One thing to be clear about before the list: these are not 7 different companies. They are three, Master Airbrush, Timbertech and Gocheer, in 7 different configurations, which is exactly how this category works at the beginner end. The interesting differences are between a tankless dual fan compressor, a piston compressor with a storage tank, and a mini unit sold on a peak pressure figure, not between logos. For more craft and hobby equipment, see our arts, crafts and sewing guides.

Pros
- Three airbrushes cover both gravity and siphon feed
- Dual cooling fans allow longer working sessions
- Paint, hose and manual included so nothing is missing
- Deepest customer rating history in this category
- Suits models, crafts, automotive work and tattoo practice
Cons
- Tankless, so air comes straight from the piston
- Bulkier on a desk than a mini compressor
The Cool Runner II kit takes the top spot because it removes the two things that stall a first session: a compressor that stops when it gets warm, and a missing part. Dual cooling fans let the motor run rather than cut out partway through a coat, and the box arrives with three airbrushes, paint, hose, cleaning brushes and a manual, so the first evening is spent spraying rather than ordering.
Three guns is more useful than it sounds for someone who does not yet know what they will paint. Two feed types are represented, so you can compare a gravity cup for fine work against a siphon bottle for covering larger areas without buying twice, and you can leave one gun loaded with a base colour while cleaning another.
The main reservation is that there is no storage tank. Air arrives as a rapid series of piston pushes rather than a flat stream, which is invisible on a broad coat and slightly visible in a fine line or a soft fade. A longer hose helps, and an inline regulator with a moisture trap is the natural first upgrade if you decide to stay with the hobby.
Bottom line: the most complete starting point here, and the one to buy if you want to learn the craft rather than assemble a system.
- Compressor: piston with dual cooling fans
- Tank: none, direct feed
- Airbrushes: three, gravity and siphon feed
- Trigger: dual action
- Paint: six colour acrylic set
- Hose: braided air hose supplied
- Extras: cleaning brushes and learning manual
Complete beginners who want one purchase that covers everything, and households where more than one person will use the equipment.
Anyone who already owns an airbrush should buy air supply on its own instead, since paying for three more guns adds nothing.
Spend the first hour on scrap card, spraying lines and dots at around 15 to 20 pounds per square inch, before touching anything you care about. Thin the paint until it flows like milk.
Clean the gun the same evening you use it. Acrylics harden quickly, and a nozzle left loaded overnight is the usual reason a new airbrush appears to be faulty.

Pros
- Dual action trigger teaches proper paint control
- Gravity feed sprays at lower pressure and cleans quickly
- Compact enough for a desk or a shared table
- Strong accumulated feedback for a starter set
- Covers models, tattoo practice, makeup and craft work
Cons
- No storage tank, so pressure pulses slightly
- One airbrush only, so colour changes mean cleaning
The TIMBERTECH set is the straightforward version of a starter kit: one good dual action gravity feed gun, a compressor, a hose, and nothing else to think about. For a beginner that clarity has value, because a single gun forces you to learn cleaning properly rather than reaching for a second one when the first clogs.
Gravity feed is the right default for learning. Paint falls into the airstream instead of being lifted, so the gun sprays at lower pressure, wastes very little from a small cup, and flushes clean in one pass. Dual action means air on the downstroke and paint on the pull back, which is the movement every fade and tapered line depends on.
The compressor is tankless and compact, which means air arrives in piston pulses and the motor has limited thermal headroom, so long sessions need breaks. There is also no regulator named in the description, so a small inline regulator with a moisture trap is worth budgeting for if you move on to solvent paints or fine detail.
Bottom line: a clean, sensible single gun starter set, best suited to small work rather than covering panels.
- Compressor: compact tankless unit
- Airbrush: one, gravity feed
- Trigger: dual action
- Cup: integrated gravity cup
- Hose: air hose supplied
- Uses: models, tattoo practice, makeup, craft
- Regulator: not named in the listing
Check whether the listing you order includes a regulator and moisture trap. Without them you spray at whatever the pump delivers, and pressure is the setting that most affects finish quality.
If you expect to spray large surfaces or thick primer, a siphon feed gun or a 0.5 millimetre nozzle will serve better than this one.
Flush the cup between colours and strip the needle at the end of every session. Dried acrylic in the nozzle is the most common cause of spitting in a new gun.
Give the compressor air on all sides and keep it off carpet, since a blocked intake on a tankless unit brings the thermal cut out forward.
Pros
- Three nozzle sizes included, from fine detail to base coats
- High peak pressure gives headroom for thicker fluids
- Mini format packs away easily
- Cleaning set included in the box
- Covers craft, cake decorating and cosmetic uses
Cons
- Mixed customer feedback compared with the established kits
- Mini tankless body has little thermal headroom
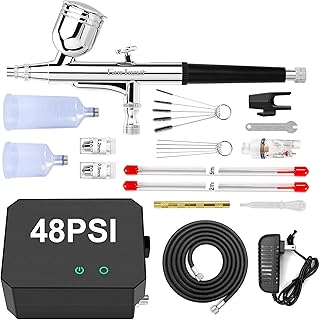
The Gocheer kit is the one that hands you the whole nozzle range at the start. Sets in 0.2, 0.3 and 0.5 millimetres mean you can move from fine detail to base coats without buying another gun, which is genuinely useful once you know what you want to spray and slightly hazardous before then.
Its headline figure of 48 pounds per square inch is a peak pressure measured against a closed outlet, not a working pressure. Read it as headroom rather than as performance, because model paint sprays at roughly 15 to 20 and craft work at 20 to 30. That headroom does help with thicker fluids such as primer or textile paint.
Two cautions. Customer feedback on this kit is more mixed than on the long established sets here, and a mini sealed body has nowhere to put heat, so it reaches its thermal cut out sooner than a fan cooled unit. Start with the 0.3 nozzle and leave the 0.2 in the case until thinning and cleaning are second nature.
Bottom line: the widest nozzle choice for the least outlay, with the least consistent record of the group.
- Peak pressure: rated to 48 PSI
- Compressor: mini tankless unit
- Nozzles: 0.2, 0.3 and 0.5mm sets
- Feed: gravity, top mounted cup
- Extras: cleaning set included
- Uses: models, cake decor, makeup, nail art
- Format: compact and portable
Fit the 0.3 nozzle first and keep the matching needle with it. Needle and nozzle are a matched pair, and mixing sizes produces spitting that looks exactly like a faulty gun.
For cake work use only food safe colours and a dedicated gun, and never share a gun between edible and solvent based paints.
If you want one nozzle and a reliable machine, the established kits here are the safer buy. If you want to try fine detail and broad coats cheaply, this is the one that includes both.
Plan on an inline moisture trap. A mini compressor without one will eventually put a droplet into a clear coat.

Pros
- G22 gun is a long standing and widely supported model
- 0.3mm tip is the right general purpose starting size
- Small fluid cup wastes very little paint
- Replacement needles and nozzles are easy to find
- Piston compressor rather than a sealed mini unit
Cons
- No storage tank, so delivery pulses slightly
- One gun means cleaning between every colour change
The G22 is one of the most widely used beginner airbrushes in the category, and that matters for a reason people overlook: spare needles, nozzles and seals are easy to find. An airbrush is a consumable at the tip, and a gun whose parts are stocked everywhere stays usable for years while an unbranded one becomes disposable the first time a needle bends.
The specification is deliberately ordinary in the best sense. Gravity feed with a small cup, dual action trigger, a 0.3 millimetre tip that suits almost everything a beginner attempts, and a 1/5 horsepower piston compressor rather than a sealed mini unit that runs out of cooling.
What it does not have is a tank, so air still arrives in pulses, and there is no second gun for quick colour changes. That is the trade for buying a known quantity: fewer accessories, better fundamentals. If you would rather have three guns and paint in the box, the Cool Runner II kit is the alternative.
Bottom line: the sensible single gun choice, and the easiest of these to keep running for years.
- Airbrush: Master Airbrush G22
- Feed: gravity, small fluid cup
- Trigger: dual action
- Tip: 0.3mm fitted
- Compressor: 1/5 HP piston
- Tank: none
- Hose: supplied
Beginners who expect to keep going and want a gun with easy spare part supply rather than a box full of extras.
Anyone painting large surfaces regularly should add a siphon feed gun or a larger nozzle later.
Keep a spare needle and nozzle in the case. Bent needles are the normal failure on a gravity feed gun, and a spare turns a lost weekend into a five minute job.
Drain nothing and clean everything: flush between colours, strip at the end of the session, and never leave a loaded cup on the bench.

Pros
- Storage tank delivers flat air with no piston pulsing
- Pressure switch means the motor is idle most of the session
- Regulator lets you set and read a working pressure
- Moisture trap keeps condensate out of the hose
- Cooling fan extends how long it can run
Cons
- No airbrush included, air supply only
- Heavier and larger than any tankless unit here
This is the unit that fixes the problem the rest of the shortlist works around. A three litre tank means the motor fills a reservoir and stops, and the air reaching your gun comes from the tank rather than from the piston, so it is genuinely flat. Fine lines stop going ragged and soft fades stop banding, which is the difference people expect from a better airbrush and actually get from better air.
The supporting parts are right too. A regulator with a gauge lets you set 15 to 20 pounds per square inch for model paint and read what you set, a moisture trap catches the water that compression squeezes out of the air, and a cooling fan plus the pressure switch means the motor spends most of a session silent rather than running continuously.
The catch is the obvious one: there is no airbrush in the box. This is an air supply, so budget for a gun as well, and it is bigger and heavier than a mini compressor, which matters if it has to live in a cupboard between sessions.
Bottom line: the best air in this shortlist, for buyers who understand they are buying only half a system.
- Tank: three litre storage tank
- Motor: single piston, oil free
- Cooling: fan fitted
- Regulator: yes, with gauge
- Moisture trap: included
- Shut off: automatic on tank pressure
- Airbrush: not included
Read the listing twice before ordering. This is a compressor on its own, so pair it with a gun and a hose, and check the outlet thread matches the hose you buy.
Choose this over a kit if you already own an airbrush, if you paint models seriously, or if noise in a shared house is a concern.
Set the regulator with the gun trigger open, not closed, since pressure reads higher against a shut nozzle than it does while air is flowing.
Open the tank drain after every session. Water collects at the bottom, and standing water in a steel tank is how a compressor rusts from the inside.
Pros
- Dual fans allow long sessions without a thermal stop
- Regulator with a gauge lets you set working pressure
- Water trap keeps condensate out of the paint
- Airbrush holder keeps a loaded gun off the bench
- Established platform with easy spare part supply
Cons
- Tankless, so air still arrives in piston pulses
- Takes more bench space than a mini compressor
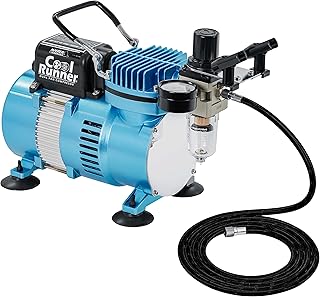
The TC-320 kit is the middle path between a mini compressor and a tanked one. There is no reservoir, so air comes straight from the piston, but two cooling fans and a proper piston motor mean it is designed to keep running rather than to cut out after a quarter of an hour, and that is the limit most beginners hit first.
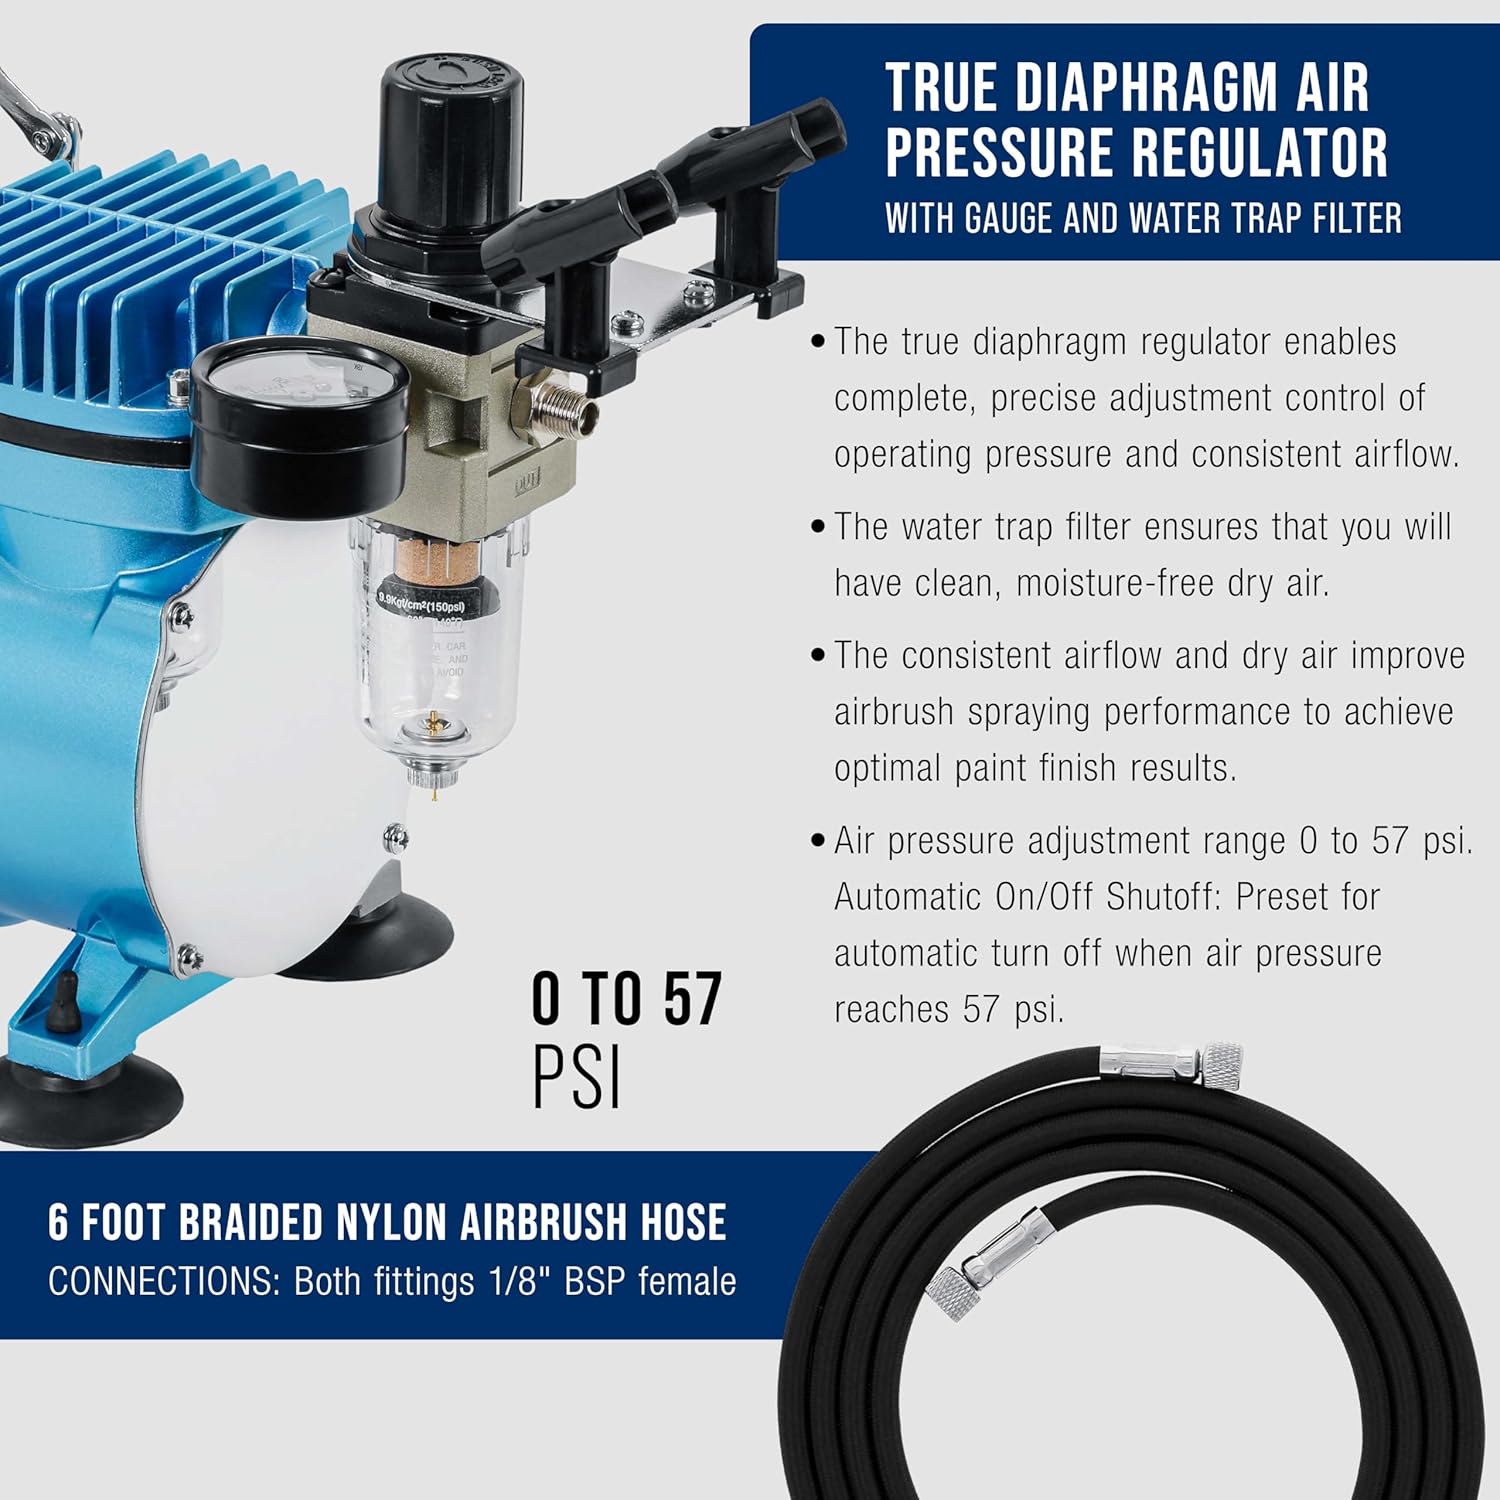
What lifts it above the plain kits is the plumbing at the outlet. A regulator with a gauge means you can actually set 15 to 20 pounds per square inch for model paint instead of spraying at whatever the pump delivers, and a water trap catches the condensate that otherwise arrives as a droplet in a clear coat. Those two parts are the difference between guessing and controlling.
The airbrush holder is a small thing that saves a lot of mess, since a loaded gun laid on a bench leaks. Against the tanked Timbertech unit it still pulses slightly and runs more of the time, so if flat air and quiet operation matter most, the tank wins.
Bottom line: the best tankless setup here, and the pick if you want control over pressure without stepping up to a tank.
- Compressor: TC-320 with dual fans
- Motor: 1/5 HP piston
- Tank: none
- Regulator: yes, with gauge
- Water trap: fitted
- Holder: airbrush holder included
- Duty: designed for continuous running
Beginners who already know they will keep painting and want pressure control and cooling without the size of a tanked compressor.
Anyone spraying long sessions of fine detail should consider the tanked unit instead for flatter air.
Empty the water trap when it collects liquid, and check it before a clear coat rather than after ruining one.
Leave clearance around both fans and keep the unit off soft surfaces, since fans that cannot draw air are decorative.

Pros
- Lowest commitment way to find out if the hobby suits you
- Sample paints and cleaning brushes included
- Mini format stores in a drawer between sessions
- Gravity feed gun sprays at low pressure
- Good rating history for an entry level set
Cons
- Mini tankless compressor has the least thermal headroom
- Basic set, so a regulator and moisture trap come later
The AS18-2K is the value pick because it answers a question rather than solving a problem. Plenty of people are not yet sure whether they will enjoy airbrushing, and the honest way to find out is a small kit with a gun, a hose, cleaning brushes and enough paint to ruin a few practice pieces. This is that kit.
What is here works. A gravity feed gun sprays at low pressure and cleans in one flush, the cleaning brushes are the accessory beginners most often forget to buy, and the mini compressor is quiet enough and small enough to live in a drawer rather than needing a permanent home on a bench.
Its limits are the ones you would expect. No tank, so air pulses, and a sealed mini body reaches its thermal cut out sooner than a fan cooled compressor, which means working in short sessions with breaks. There is no regulator, so pressure is whatever the pump gives, and adding an inline regulator with a moisture trap is the sensible first purchase after it.
Bottom line: the right kit for finding out whether you like the hobby, and the wrong one for a long project.
- Compressor: mini tankless unit
- Airbrush: one, gravity feed
- Hose: air hose supplied
- Extras: cleaning brushes and sample paints
- Regulator: not included
- Tank: none
- Format: compact start kit
First time users testing the water, and parents buying for a teenager who has asked to try model or craft painting.
Anyone with a project already planned should start with a fan cooled or tanked compressor instead.
Treat an inline regulator with a moisture trap as part of the purchase rather than an upgrade. It is inexpensive and it is what makes pressure repeatable.
Work in short sessions and let the compressor cool. A mini unit that stops has reached protection, not failure, so give it time rather than switching it straight back on.
How to Choose an Airbrush Kit For Beginners
The criteria below are ordered by how much they change what comes out of the nozzle on your first evening, rather than by how prominently they appear in a listing.
The Compressor Matters More Than the Airbrush
Beginners spend their attention on the gun because that is the part you hold. In practice the airbrushes bundled with these kits are close cousins of one another, all dual action gravity or siphon feed guns with a needle in the 0.3 millimetre region, and any of them will atomise thinned paint. The compressor is where the real differences live, and it is the part that cannot be upgraded by cleaning it more carefully.
Three compressor traits decide your experience: whether air passes through a storage tank on its way to the hose, how long the motor is rated to run before it needs to cool, and whether the outlet has a regulator so you can set a working pressure and read it. A unit with all three feels like a tool. A unit with none of them feels like a toy that happens to make noise.
This is also why the Timbertech ABPST08 sits in this shortlist despite being sold as a compressor on its own, without a gun. If you already own an airbrush, or intend to buy one you actually want rather than the one that came in a box, buying the air supply separately is the more sensible order to do things in. Just read the listing carefully so the absence of an airbrush is not a surprise.
Tank or No Tank, and What Pulsation Does to a Line

A piston compressor does not produce a smooth stream of air. It produces a rapid series of pushes, one per stroke, and without something to even them out those pushes travel down the hose and reach the nozzle as small waves of pressure. On a broad coat you will not see it. On a fine line at low pressure you see the edge go slightly ragged, and on a soft fade you see faint banding that no amount of practice removes.
A storage tank fixes this by design. The motor fills the tank, the tank feeds the hose, and the air leaving the tank has no memory of the strokes that put it there. That is the single biggest reason to prefer a tanked unit like the Timbertech ABPST08 over a tankless one, and it is why tanked compressors are the default in professional model shops rather than a luxury.
Tankless kits are not disqualified, and most beginners start with one. A dual fan design of the Cool Runner II type, and a good quality braided hose with an inline regulator, both smooth the delivery considerably, and the longer the hose the more it damps the pulses. If you buy tankless, buying a small inline moisture trap and regulator later is the cheapest meaningful upgrade available to you.
Duty Cycle and the Value of Automatic Shut Off
Small compressors are rated for a maximum continuous run time, often something like fifteen to thirty minutes, after which they need to cool. That figure is rarely printed on the front of the box and it is the specification most likely to interrupt a painting session, because priming, spraying, clearing and colour changes stretch a twenty minute job across an hour of the compressor being switched on.
Two design features extend the working session. Cooling fans, which is what the dual fan label on the Master Airbrush units describes, let the motor shed heat while it runs. Automatic shut off, which comes with a tank, means the motor is not running at all most of the time: it fills the tank, stops, and only restarts when pressure drops. A tanked unit with a pressure switch spends most of a session silent.
Small mini compressors of the type sold in the cheapest kits have the least thermal headroom, since a compact sealed body has nowhere to put the heat. If a unit stops partway through a session it has almost certainly reached a thermal cut out rather than failed. Let it cool completely instead of switching it back on straight away, because repeatedly restarting a hot motor is what turns protection into damage.
Working Pressure Is Not the Number on the Box
Listings advertise figures like 40 or 48 pounds per square inch, and those are peak pressures measured against a closed outlet with no air flowing. They describe what the pump can build, not what you will use. Model paint sprays at roughly 15 to 20 pounds per square inch, general craft and stencil work sits around 20 to 30, and only heavy work like thick primers or textile paint pushes higher.
This has a direct practical consequence, which is that a regulator matters more than a high ceiling. Without one you spray at whatever the pump happens to deliver, and too much pressure is a real fault rather than a preference: it over atomises the paint, dries it in flight, and leaves a dusty, gritty surface instead of a wet coat that levels itself. Too little pressure spits and leaves tails behind the line.
So read a 48 pound figure as a sign of a compressor with headroom, then check whether the outlet has a gauge and a knob. The Master Airbrush TC-320 kit and the Timbertech tanked compressor both name a regulator in their descriptions. Where a mini unit has no regulator at all, you are choosing pressure by hose length and hope, which is a poor way to learn what pressure does.
Gravity Feed or Siphon Feed
A gravity feed airbrush has a cup on top and paint falls into the airstream. It needs less air to pull paint through, so it sprays at lower pressure, and it wastes very little because the cup holds a small amount and empties completely. It is also the easier of the two to clean, since flushing thinner through the cup rinses the whole paint path in one pass.
A siphon feed airbrush hangs a bottle underneath and lifts the paint using the air passing over the tube. Bottles hold far more, which matters when you are covering a large surface or spraying the same colour repeatedly, and swapping colours can be as quick as swapping jars. The trade is that it needs more pressure to lift the paint, and there is more plumbing to clean afterwards.
For a first kit, gravity feed is the better default: lower pressure, less waste and less cleaning suit small work like models, figures, nails and cake decoration. That is why most kits here are gravity feed. The Master Airbrush Cool Runner II sets include both types, which is genuinely useful for someone who does not yet know whether they will be painting figures or covering panels.
Needle and Nozzle Size, and Where to Start
Nozzle size sets the range of line widths a gun can produce. A 0.2 millimetre nozzle is for fine detail, camouflage edges, freehand work on figures and portrait style shading. A 0.3 is the general purpose size, which is why almost every kit ships with one. A 0.5 moves a lot of paint for base coats, large surfaces and thicker fluids that a small nozzle would simply block.
Beginners should start at 0.3 and stay there for a while. A fine nozzle is not more capable, it is less forgiving: it demands better thinning, cleaner paint and steadier hands, and it clogs during the exact learning phase when you cannot yet tell a clog from your own technique. Most of the frustration attributed to cheap airbrushes is actually a 0.2 nozzle being asked to spray unthinned paint.
Kits that include several nozzle and needle sets, such as the Gocheer with its 0.2, 0.3 and 0.5 assortment, give you room to grow without buying another gun. Just remember that a needle and nozzle are a matched pair. Mixing sizes, or fitting one without seating the other properly, produces exactly the spitting that sends new users looking for a replacement compressor.
Single Action Against Dual Action Triggers

A single action airbrush works like an aerosol can. Press the trigger and you get air and a preset amount of paint, and the amount is adjusted with a screw rather than with your finger. It is easy to learn and consistent, which suits stencil work, base coats and nail art where you want the same output all day.
A dual action trigger separates the two: pressing down gives air, pulling back adds paint, so you control volume continuously while spraying. That is what makes soft fades, tapering lines and controlled shading possible, and it is why every serious model painter uses one. It takes a few evenings for the movement to become automatic, and during those evenings your lines will be inconsistent.
Nearly every kit in this shortlist is dual action, which is the right choice even though it is the harder one. Learning on a single action gun means relearning later, whereas the initial awkwardness of dual action passes quickly with practice on paper. Spend the first hour spraying lines and dots on scrap card rather than on the model you care about.
Moisture in the Air Line Ruins Finishes
Compressing air squeezes the humidity in it into liquid water, and that water travels down the hose with the air. It arrives as an occasional droplet that hits wet paint and blooms into a crater or a run, usually on the last clear coat of something you have spent a week on. In a humid room or a warm garage it happens often enough to be the main cause of ruined finishes.
The fix is a moisture trap, also sold as a water trap or air filter, a small bowl that sits at the compressor outlet and collects condensate you then drain. Two units in this shortlist name one, the Timbertech tanked compressor and the Master Airbrush TC-320 kit, and where a kit does not include one it is an inexpensive part that screws onto any standard outlet.
Tanked compressors help here as well, because air resting in a tank cools and drops much of its moisture there instead of in your hose, which is why tanks have a drain valve underneath. Open it after each session. A tank left undrained for months collects standing water, and standing water in a steel tank is how a compressor rusts from the inside.
Cleaning Is Most of the Work
The honest description of airbrushing is that spraying takes minutes and cleaning takes longer. Between colours you flush the cup with the appropriate thinner and spray clear until it runs clean. At the end of a session you go further: remove the needle, wipe it, clean the nozzle, and check that no paint has dried in the threads where it will harden into a plug by tomorrow.
A blocked nozzle is the single most common reason beginners give up, and it is almost always paint left to dry inside the gun rather than a defect. Acrylics are the usual culprit because they cure fast and become insoluble once set, so the window for easy cleaning is the same evening rather than the following weekend. This is worth knowing before the first session, not after it.
The kits that bundle cleaning brushes and a manual, which most of these do, are trying to tell you something about how to spend your time. Add a cleaning pot for spraying waste into, a bottle of the right cleaner for your paint type, and the discipline of never leaving a loaded gun on the bench while you go and look at something else.
Ventilation, Masks and Where You Can Work
An airbrush turns paint into a suspended cloud, which is the point of it and also the hazard. Overspray does not settle politely on the model. It drifts, coats nearby surfaces in fine dust, and stays in the air long enough to be breathed. Water based acrylics are the mildest case, while solvent based paints, lacquers and primers deserve real respect indoors.
Practical arrangements in order of cost: work near an open window with a fan pulling air outward rather than blowing it around the room, wear a properly fitted respirator rather than a dust mask when spraying anything with solvent, and put a spray booth or at least a large cardboard box behind the work to catch overspray. Take breaks, because a small closed room fills faster than it feels like it does.
Where you set up also affects the compressor. These units are loud enough to annoy people through a wall, they need air around them to stay cool, and they should sit on a hard flat surface rather than on carpet that blocks the intake. A kitchen table is workable for water based paint on small pieces. A cupboard is not workable for anything.
| Model | Air supply | Airbrush included | Notable |
|---|---|---|---|
| Master Airbrush Cool Runner II Kit | Dual fan, tankless | Three guns, gravity and siphon | Paint set and manual in the box |
| TIMBERTECH Airbrush Kit | Compact, tankless | One dual action gravity feed | Multi purpose starter set |
| Gocheer Airbrush Kit | Mini, tankless | One gravity feed | Nozzle sets in 0.2, 0.3 and 0.5 |
| Master Airbrush G22 Kit | Piston, tankless | One dual action gravity feed | Fluid cup with a 0.3 tip |
| Timbertech ABPST08 Compressor | Piston with storage tank | None, air supply only | Regulator, moisture trap, cooling fan |
| Master Airbrush TC-320 Kit | Dual fan, tankless | One gravity feed | Regulator with water trap and holder |
| Timbertech AS18-2K Kit | Mini, tankless | One gravity feed | Simplest entry point of the group |
If you are equipping a craft space rather than buying a single tool, our category directory covers the rest of the workbench.
Why You Should Trust Us
We start from the compressor because that is where beginner disappointment comes from, and because tank, duty cycle and regulator are the three facts a listing is least likely to put on the front of the box. Every option here is a current listing with enough accumulated customer feedback to show whether a unit is still running after a second winter in a garage, which in this category is the question that matters.
We are also direct about what this shortlist is. It is three companies, Master Airbrush, Timbertech and Gocheer, offering 7 different configurations, not 7 independent brands, and pretending otherwise would give a false impression of choice. The useful comparison is between air supply designs, so we group them that way and say plainly when a listing is a compressor with no airbrush attached. We do not accept payment for placement.
Final Thoughts
The Master Airbrush Cool Runner II kit is our best overall pick because it answers the beginner problem completely: a dual fan compressor that can keep running, three airbrushes covering both gravity and siphon feed, paint, hose and a manual, so the first session is not delayed by a missing part. It has the deepest customer rating history of anything here, which for a machine that has to survive storage is worth more than a specification.
The Timbertech AS18-2K kit is our best value choice, the simplest way to find out whether airbrushing suits you before committing to a tank. If you already own a gun, or want the flat pressure and quiet operation that only a tank delivers, the Timbertech ABPST08 compressor is the one to buy, remembering that it comes without an airbrush. The Master Airbrush TC-320 kit sits between the two, tankless but supplied with a regulator and water trap.
Whichever you choose, three habits will carry you through the first month: thin the paint more than feels right, spray at around 15 to 20 pounds per square inch rather than wide open, and clean the gun the same evening you use it. More hobby equipment guides are in our latest guides.
Frequently Asked Questions
Does an airbrush kit for beginners need a compressor with a tank?
Not to begin with, but a tank is the upgrade you eventually want. Air taken straight from a piston arrives in pulses, which shows up as ragged fine lines and faint banding in fades, while air drawn from a tank is flat. A tank also means the motor runs only to refill, so it is quieter and cooler. Tankless kits with cooling fans and a regulator are a reasonable starting point.
What nozzle size should a beginner start with in 2026?
A 0.3 millimetre nozzle, which is why nearly every kit ships with one. A 0.2 is for fine detail and is far less forgiving about thinning and cleanliness, so it clogs at the exact moment you cannot tell a blockage from your own technique. A 0.5 is for base coats and thick fluids. Learn on 0.3, then add sizes once you know what you are asking the gun to do.
Why is my airbrush spitting instead of spraying?
Usually paint that is too thick, pressure that is too low, or dried paint in the nozzle. Work through them in that order: thin the paint until it flows like milk, raise the pressure toward 20 pounds per square inch, then strip and clean the needle and nozzle. Check also that the needle is seated fully and that the nozzle matches it, since a mismatched pair spits no matter what else is right.
How often does an airbrush need cleaning?
Flush between every colour change and strip it properly at the end of each session. Acrylics cure quickly and become very hard to remove once set, so the easy window is the same evening rather than the next weekend. A blocked nozzle is the most common reason people abandon airbrushing, and it is nearly always dried paint rather than a fault in the gun.
Can I use an airbrush kit for beginners indoors?
With water based acrylics, small work and an open window with a fan pulling air outward, yes. With solvent based paints, lacquers or primers, work in a well ventilated space and wear a properly fitted respirator rather than a dust mask. Overspray drifts and settles as fine dust, so put a booth or a large box behind the work. More craft equipment picks are in our arts and crafts section.


Write Your Review
No reviews yet. Be the first to share your experience!