

A polycarbonate greenhouse gives you the one thing a plastic hoop tunnel never will: a rigid, insulated shell that holds heat overnight and shrugs off hail, falling branches, and the kind of gust that flattens film covers by February. We built this shortlist of 8 polycarbonate greenhouse picks for September 2026 around structures you can genuinely walk into, ranked on frame quality, panel construction, ventilation, and how each kit behaves once the weather turns. The lineup pulls from HOWE, Backyard Discovery, SYLVIERA and more, and it spans everything from a compact starter house that fits beside a fence to a cedar-framed showpiece big enough to double as a garden room.
Our top pick is the Backyard Discovery Willow 9 ft x 6 ft Cedar and Polycarbonate Walk-In Greenhouse Kit for its rot-resistant cedar frame, factory-fitted exhaust fan, and the strongest customer rating in this guide. Below you will find the full lineup, followed by the buying criteria that separate a greenhouse you keep for a decade from one that starts rattling apart in its second winter. If you are still deciding what to grow under cover, our roundup of the best heirloom seeds is a useful companion read for planning that first season.

Pros
- Rot and insect resistant cedar frame insulates far better than bare aluminum
- Powered exhaust fan and opening windows handle summer heat without add-ons
- PowerPort outlet and hose hook-ups let you run fans, lights and irrigation
- Staging shelves are included rather than sold separately
- Strongest owner rating of any greenhouse in this guide
Cons
- Heaviest and most involved assembly in the lineup
- Cedar needs a coat of sealer every few years to keep an even colour
- Fixed footprint with no manufacturer extension kit
The Willow is Backyard Discovery's mid-size cedar greenhouse, and it sits in a different category from the aluminum kits that dominate this price bracket. Instead of extruded metal channels holding thin sheet, you get a timber-framed structure with polycarbonate glazing, assembled from pre-cut lumber much the way you would build a small shed. The 9 ft x 6 ft footprint is the sweet spot for a home gardener: a bench down one side, floor space for tall pots on the other, and an aisle you can actually kneel in.
What sets it apart is how much is already solved when the box arrives. A powered exhaust fan is fitted, so the single biggest failure mode of cheap greenhouses, midsummer overheating, is handled without buying an aftermarket vent opener. Opening windows add passive cross flow. Hose hook-ups mean irrigation without running a pipe through a gap in the door, and the PowerPort gives you a proper electrical outlet inside for a heat mat, grow lights or a propagator. Staging shelves come with the kit rather than appearing as a separate line item at checkout.
The compromises are the ones you would expect from timber. It is by a wide margin the heaviest build here, and it asks for a full weekend and a second pair of hands. Cedar is naturally rot resistant but it will silver over time unless you seal it, so budget for a can of finish every few years if you care how it looks. And the footprint is what it is: there is no extension bay to add later, so buy the size you will still want in three seasons.
Bottom line: this is the greenhouse to choose if you want a structure that reads as permanent garden architecture rather than a temporary plastic box, and it carries the strongest owner rating in this guide to back that up.
- Footprint: 9 ft x 6 ft walk-in
- Frame: cedar wood, rot and insect resistant
- Glazing: polycarbonate panels on roof and walls
- Ventilation: powered exhaust fan plus opening windows
- Utilities: PowerPort electrical outlet and hose hook-ups
- Included: staging shelves
- Door: full-height walk-in entry
- Use: year-round outdoor gardening
This suits the gardener who is past the seed-tray stage and wants a permanent growing space rather than a seasonal shelter. If you plan to run a heat mat or lights through winter, the built-in PowerPort alone justifies the step up from an aluminum kit.
It is also the right pick when the greenhouse will be visible from the house. Cedar and glazing look like a considered garden building, which matters in a small yard where the structure is part of the view. It is less suited to renters or anyone who expects to move it, because taking a timber-framed kit apart and reassembling it is not a casual job.
Site it on level, well-drained ground and anchor the base to a timber perimeter or paver ring rather than trusting soil alone. Cedar will weather to a soft grey if left bare, which many owners prefer; if you want the original tone, apply an exterior sealer every two to three years and keep the base rail clear of piled mulch so it can dry after rain.
Clean the polycarbonate with mild soapy water and a soft cloth only. Solvents, abrasive pads and pressure washers all damage the UV-protective coating, and once that layer goes the panel yellows quickly. Check the fan filter and vent hardware at the start of each season, and keep the door latched in windy weather.

Pros
- Long 12 ft run fits beside a fence or along a boundary wall
- Sliding doors need no swing clearance and do not catch the wind
- Heavy-duty aluminum frame will not rust or need sealing
- Roof vent window gives passive cross flow with the doors open
- Silver finish stays cooler in direct sun than dark frames
Cons
- Only one roof vent for a large floor area, so an auto opener is worth adding
- The 6 ft width limits you to benching on one side plus an aisle
- Long span needs careful levelling or the sliding doors bind
The YITAHOME 12 ft x 6 ft solves a specific problem better than anything else in this guide: what to do with a long, narrow strip of ground. Most greenhouse kits are square-ish, which is efficient for volume but useless when the only spare space you have runs along a fence line. At twelve feet long and six wide you get a genuine walk-in aisle with a full bench down one side and seventy-two square feet of floor without eating into the middle of the lawn.
The frame is heavy-duty aluminum, which is the right call for a long span. It will not rust, it does not need any finish, and the extruded channels let the polycarbonate sheets slide into place rather than being screwed through. The silver anodised finish also reflects more heat than the charcoal and black frames elsewhere in this lineup, which is a small but real advantage in a house this shape, because a narrow structure heats up faster than a wide one.
Sliding doors are the other smart choice here. On a boundary run there is often no room for a door to swing outward, and a hinged door left open in wind is the classic way to lose a roof panel. Sliders sidestep both problems. The weakness is ventilation: one roof vent window is thin provision for this floor area, and on still summer days you will want the doors wide open or an automatic wax-cylinder opener fitted. The long span also punishes a sloppy base, so spend the extra hour getting the ground level and the base frame square before anything else goes up.
Bottom line: the shape is the selling point. If your site is a strip rather than a square, this is the most usable house here, provided you plan for extra ventilation.
- Footprint: 12 ft x 6 ft walk-in
- Frame: heavy-duty aluminum, silver finish
- Glazing: polycarbonate panels
- Doors: sliding, no swing clearance required
- Ventilation: roof vent window
- Floor area: approximately 72 square feet
- Use: garden, backyard and boundary siting
Measure before you order. The twelve-foot length wants a genuinely straight, level run, and you should add clearance at both ends so you can reach the corner glazing for cleaning and repairs. Along a fence, leave at least a foot behind the structure or you will never get to that face again.
Because the house is only six feet wide, plan the interior as one bench and one aisle rather than benching both sides. Tall crops such as tomatoes and cucumbers go on the floor at the far end where the aisle widens, and seed trays go on the bench near the door where you handle them most.
Level the ground across the full twelve feet before opening the box. A long structure amplifies any dip: a half-inch drop at one end is enough to rack the frame and stop the sliding doors running true. A string line and a spirit level on a straight board will show you what needs correcting.
Build and square the base frame first, check the diagonals match, and anchor it before adding uprights. Keep the protective film on the polycarbonate until each sheet is seated so the panels do not scuff, and make sure the UV-coated face points outward on every one.
Pros
- Most owner feedback of any greenhouse in this guide by a wide margin
- 4mm twin-wall panels are impact resistant and hold overnight heat
- Lockable door and vented roof window come as standard
- Hygrometer included so you can track humidity from day one
- Small enough for a patio, side yard or narrow balcony terrace
Cons
- 6 ft x 4 ft fills up fast once you start potting on
- Single roof vent needs help on the hottest days
- Light structure must be anchored properly or wind will move it
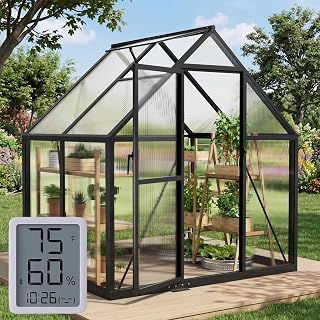
The SYLVIERA 6 ft x 4 ft is the entry point to this category and it has collected more owner feedback than any other structure in this guide, which tells you how many people start here. The specification is honest for what it is: a reinforced aluminum alloy frame, 4mm twin-wall polycarbonate panels, a lockable door, an adjustable roof vent, and ground spikes for anchoring. Nothing exotic, but nothing missing either.
Twin-wall at 4mm is the important detail. Plenty of cheap greenhouses in this size use single-wall corrugated sheet or PE film, and neither holds overnight heat. The hollow-core panels here trap a layer of air between two skins, which is what lifts your night-time minimum a few degrees above outside and lets you start seeds weeks earlier. The panels are impact resistant too, so a hailstorm or a stray football does not end the season.
The hygrometer is a small thing that turns out to be genuinely useful for a beginner, because humidity is the variable most new greenhouse owners ignore until something goes mouldy. Being able to glance at a number rather than guess shortens the learning curve. The limits are the ones inherent to the footprint. Twenty-four square feet is enough for seed starting, hardening off and a handful of container crops, but it will feel tight by the second season. The single roof vent also needs help in high summer, and an automatic wax-cylinder opener is the cheapest upgrade you can make. Anchoring is not optional: this is a light structure with a large flat face, and it must be pegged or bolted down.
Bottom line: the best value on this list by a clear margin, and the right first greenhouse for anyone who wants to extend a season without committing to a permanent garden building.
- Footprint: 6 ft x 4 ft walk-in
- Frame: reinforced aluminum alloy
- Glazing: 4mm twin-wall polycarbonate
- Door: lockable, hinged
- Ventilation: adjustable roof vent window
- Included: hygrometer, ground spikes, assembly hardware
- Mounting: soil spikes or base-fixing to timber, paver or concrete
This is the first-greenhouse pick. If your gardening currently happens on a windowsill and a couple of trays under a cloche, this gives you a lockable, walk-in space for a fraction of what a full-size kit costs, and it fits on a patio or a side yard where nothing bigger would go.
It also works as a second structure for people who already have a large greenhouse and want a separate space at a different temperature, for hardening off or for keeping a batch of cuttings away from the main crop. It is not the right choice if you already know you want to grow tall crops to maturity, because headroom and floor space run out quickly.
Anchor it before you leave it unattended. Use every ground spike supplied, drive them vertically into firm soil, and if you can, bolt the base rail to a timber perimeter or paver ring instead. A greenhouse this light with a face this flat is the classic candidate for storm damage, and almost every failure traces back to the anchoring rather than the panels.
Keep the door latched when you are not inside. Wash the polycarbonate with mild soapy water and a soft cloth only, never a solvent or an abrasive pad, because the UV-protective coating is what stops the panels going yellow and brittle. Check the vent hinge and the panel clips before winter.

Pros
- Largest footprint in this guide with room for staging on both sides
- 9.5 ft ridge height means you work standing up and can grow tall crops
- Four vent windows give far better cross flow than single-vent kits
- Lockable double doors open wide enough for a barrow or full trays
- Pavilion profile doubles as a covered patio or sunroom
Cons
- Needs a large, genuinely level site and a prepared base
- Big assembly job that realistically takes a full weekend with two people
- Dark frame finish absorbs more heat than a silver one
At 16 ft by 12 ft with a 9.5 ft ridge, this HOWE is not really competing with the rest of the aluminum kits here. It is closer to a small garden building than a greenhouse, and the pavilion styling is deliberate: plenty of owners use these as a sunroom or covered patio as much as a growing space. Nearly two hundred square feet of floor gives you staging along both walls, a central aisle wide enough to work in, and space at one end for tall crops trained to the roof.
Ventilation is where the size premium shows. Four opening vent windows plus lockable double doors is a serious amount of opening area, and it is the difference between a greenhouse you can use in July and one you have to abandon until September. The rule of thumb is that vent area should reach fifteen to twenty percent of floor area, and while few kits at any price hit that, four vents plus wide double doors gets meaningfully closer than the single-vent budget houses.
The headroom matters more than the footprint for day-to-day use. A 9.5 ft ridge means you are not stooping under the roof line at the edges, hanging baskets and trained vines have somewhere to go, and you can install high shelving without losing the aisle. The trade-offs are practical rather than technical: this needs a large flat site, a properly prepared base, and a realistic weekend of assembly with a helper. The black frame also soaks up sun, which is welcome in spring and less so in August.
Bottom line: the pick for anyone whose greenhouse ambitions have outgrown a hobby box, and the only structure here with enough opening vent area to stay workable through a hot summer.
- Footprint: 16 ft x 12 ft, approximately 192 square feet
- Ridge height: 9.5 ft
- Frame: aluminum, black finish
- Glazing: polycarbonate panels
- Ventilation: four opening vent windows
- Doors: lockable double doors
- Style: pavilion profile, suited to patio or garden siting
A structure this size needs a real base. Level ground across the full sixteen by twelve is the minimum, and a timber perimeter, paver ring or concrete pad is strongly preferable to soil spikes alone, because the wind load on a face this large is substantial.
Leave working clearance on all four sides so you can clean the outside of the glazing and reach any panel that needs replacing. Think about drainage too: a big roof sheds a lot of water at the eaves, and without a gutter or a gravel strip the ground around the base will stay permanently wet.
This is the size at which a greenhouse changes what you can grow. Tall indeterminate tomatoes, trained cucumbers, citrus in pots and a propagation bench can all coexist without competing for the same square foot. Staging on both walls plus floor space in the middle means you can run a nursery area and a cropping area at the same time.
It also opens up year-round use in a way smaller houses do not, because the larger air volume buffers temperature swings. Heating a space this size costs real money, so if you plan to run it through winter, insulate the north wall with bubble film and zone the heated area rather than trying to warm the whole structure.

Pros
- 5.2 ft side walls leave real usable space above bench height at the edges
- Double swing doors open wide for barrows, trays and hot-day ventilation
- Two roof vents rather than the single vent common at this size
- 7.5 ft ridge gives comfortable standing headroom throughout
- Aluminum frame needs no sealing or rust treatment
Cons
- Fewest owner reviews of the aluminum houses in this guide
- Swing doors need clearance and must be latched in wind
- Black frame runs warmer in direct sun than a light finish
The number to notice on this HOWE is not the 8 ft by 10 ft footprint, it is the 5.2 ft side wall height. Most greenhouses in this size class have low eaves, which means the roof line starts cutting into your working space right where the benches go. Raise the walls above waist height and the whole interior changes: you can put staging along both edges and still grow something on it, rather than reserving tall plants for the centre aisle.
Combined with a 7.5 ft ridge, that gives comfortable standing headroom throughout and a genuinely square-feeling interior. Eighty square feet is enough for two benches and a walking aisle, which is the layout most home growers actually want. The aluminum frame is the usual advantage: no rust, no sealing, and extruded channels that take the polycarbonate sheets without screwing through them.
Ventilation is decent rather than generous. Two roof vents beat the single opener you get on most budget houses, and the lockable double swing doors add a large opening when you need it, but on a hot still day you will still want both doors wide and ideally an automatic vent opener fitted. Swing doors also need clearance in front and a firm latch, because a door left open in wind is the fastest route to losing a roof panel. This model has attracted less owner feedback than the others here, so there is a smaller body of long-term experience to draw on.
Bottom line: the best interior layout per square foot in this guide, and the one to pick if you plan to bench both sides rather than grow everything on the floor.
- Footprint: 8 ft x 10 ft, approximately 80 square feet
- Ridge height: 7.5 ft
- Side wall height: 5.2 ft
- Frame: aluminum, black finish
- Glazing: polycarbonate panels
- Ventilation: two opening roof vents
- Doors: lockable double swing doors
The raised walls make a two-bench layout practical. Run staging down both long sides at around 32 inches, keep the aisle between them at least 24 inches wide, and you still have head and shoulder clearance at the edges because the glazing does not start sloping until above eye level.
Reserve the end wall opposite the doors for tall crops or a trained vine, where the ridge height is most useful and where nobody has to walk. Hanging rails fixed to the roof bars give you a third growing level for trailing plants without taking any floor space at all.
Latch both doors whenever you leave. Double swing doors present a large area to the wind and a single unsecured leaf can lever itself open and pressurise the structure from the inside, which is what lifts roof panels out of their channels.
Anchor the base to a timber perimeter or paver ring rather than relying on spikes in soft ground. Clean the glazing with mild soapy water and a soft cloth only, and check the vent hinges and panel clips before storm season each year.

Pros
- Integrated rain gutters are rare at this size and enable water collection
- Two roof vents give better cross flow than single-vent competitors
- Reinforced aluminum frame with a large 80 square foot interior
- Double-wall polycarbonate holds overnight heat well
- Gutters keep runoff off the base rail and out of the doorway
Cons
- Charcoal finish absorbs heat and shows dust and pollen
- Gutters need clearing of leaves or they overflow at the corners
- Assembly is a full-day job that really needs two people
Gutters are the reason to look at this one. Most greenhouses in this bracket dump every drop of roof runoff straight onto the ground at the eaves, which turns the strip around the base into a permanent bog and splashes soil back onto the lower panels. The Jiliusure ships with rain gutters already integrated along both sides, so the water is channelled to the corners where you can put a downpipe into a butt. On an eighty square foot roof that is a meaningful volume of free irrigation water across a season.
Underneath the gutters the specification is solid rather than remarkable. A reinforced aluminum frame carries double-wall polycarbonate panels, and there are two opening roof vents, which is one more than most kits at this size manage. Eighty square feet gives you benching down both sides with an aisle between, and the walk-in interior has enough height to work comfortably. The charcoal black finish looks smart against planting but it does absorb solar heat, and it shows every mark of pollen and dust, so plan on washing the frame as well as the glazing.
The gutters do add a maintenance item. Overhanging trees will fill them with leaves, and a blocked gutter overflows at exactly the corner you did not want it to. A quick clear twice a year handles it. Assembly is a full-day job and genuinely needs a second person for the roof sections. As with every light aluminum structure, the anchoring is what determines whether it survives a storm, so use the base-fixing points rather than trusting spikes in soft ground.
Bottom line: pick this if rainwater harvesting is part of the plan, because retrofitting gutters to a greenhouse that was not designed for them is a fiddly job you will not enjoy.
- Footprint: 8 ft x 10 ft, approximately 80 square feet
- Frame: reinforced aluminum, charcoal black
- Glazing: double-wall polycarbonate panels
- Ventilation: two opening roof vents
- Drainage: integrated rain gutters along both eaves
- Entry: walk-in door
- Use: year-round outdoor growing
An 80 square foot roof sheds a lot of water. As a rough guide, an inch of rain on that area is somewhere near fifty gallons, so even a modest butt at one corner will keep a small greenhouse watered through most of the season with rainwater, which plants prefer to treated tap water anyway.
Fit a leaf strainer at the downpipe inlet, raise the butt on blocks so a watering can fits under the tap, and use a lidded container to keep algae and mosquitoes out. Position the butt on the shaded side if you can, because warm standing water goes green fast.
Clear the gutters at least twice a year and after any storm that brings leaves down. A blocked gutter backs up under the eave flashing, and water finding its way behind a panel is how the frame ends up corroding at the joints despite being aluminum.
Wash the charcoal frame at the same time, since dark finishes show pollen and dust badly. Clean the polycarbonate with mild soapy water and a soft cloth only, never a solvent or abrasive, and check the two vent hinges and every panel clip before winter.

Pros
- Slide-in panel system is the fastest assembly method in this guide
- Square 6 ft x 6 ft plan gives a bench plus real floor space for tall pots
- UV-coated 4mm double-wall panels resist yellowing and hold heat
- Adjustable roof vent lets you fine-tune airflow rather than fully open or shut
- Ground spikes and multiple base-mounting options supplied
Cons
- Single roof vent is thin provision for a sealed box in high summer
- Dark gray frame absorbs more heat than a silver finish
- Light structure that must be firmly anchored before it is left alone
Anyone who has built a budget greenhouse from individual clips knows the particular misery of kneeling in wet grass looking for a plastic fastener that pinged into the lawn. The Fly By Yan design sidesteps that. Panels slide into extruded channels in the frame rather than being clipped or screwed through, which cuts both the part count and the chance of cracking a sheet by overtightening. It is the quickest build in this guide by a comfortable margin, and it is realistic to finish a 6 ft x 6 ft in an afternoon with a helper.
The square plan is more useful than it sounds. A 6 ft x 4 ft house forces everything into a single line; six by six gives you a bench along one wall with genuine floor depth left over for tall pots, a water butt or a propagator, and the door does not open straight onto your staging. Thirty-six square feet is a real step up in what you can keep going at once.
Panels are 4mm double-wall with a UV coating, which is the right specification at this size: enough insulation to lift overnight minimums, enough impact resistance to survive hail, and the coating is what stops the sheets going yellow and brittle after a couple of summers. Make sure the coated face points outward during assembly, because the panels are not symmetrical. The limitations are ventilation and weight. One adjustable roof vent is not much for a sealed box in July, so budget for an automatic opener, and a light structure with flat faces has to be anchored properly using the supplied spikes or, better, bolted to a timber or paver base.
Bottom line: the easiest build here and the most sensible small footprint, as long as you add ventilation and anchor it like you mean it.
- Footprint: 6 ft x 6 ft, approximately 36 square feet
- Frame: aluminum, dark gray finish
- Glazing: 4mm UV-coated double-wall polycarbonate
- Assembly: slide-in panel channels
- Ventilation: adjustable roof vent
- Mounting: ground spikes plus soil, concrete or wood base fixing
- Included: assembly tools and gloves
Set the base square and level before any panel goes in, because slide-in channels are unforgiving of a racked frame: if the diagonals do not match, the sheets will not seat all the way home. Check the diagonals with a tape before anchoring.
Keep the protective film on the polycarbonate until each sheet is in its channel so the surface does not scuff, and confirm the UV-coated face is pointing outward every single time. Once assembled, add an automatic wax-cylinder vent opener as your first upgrade, and prop the door open on hot mornings for cross flow.
Anchor it properly and keep the door latched. This is a light structure with large flat faces, and it will move in a storm if it is only resting on soil. Drive every supplied spike vertically into firm ground, or bolt the base rail to timber, pavers or concrete using the mounting points provided.
Wash the glazing with mild soapy water and a soft cloth only. Solvents and abrasive pads strip the UV coating, and once that is gone the panels yellow within a season or two. Inspect the channels for grit each autumn, since debris in a slide channel stops a panel seating after any repair.

Pros
- Pergola front turns the structure into a garden room rather than a utility box
- Cedar frame insulates better than metal and takes fixings anywhere
- Exhaust fan, windows, hose hook-ups and PowerPort all included
- Generous 13 ft x 11 ft footprint with staging shelves supplied
- Strong owner rating alongside its smaller Backyard Discovery siblings
Cons
- Easily the largest investment and the longest build in this guide
- Needs a big, level, prepared site with access for delivery
- Cedar wants resealing every few years to hold an even colour
The Bellerose XL is the flagship of this guide and it is best understood as a garden building that happens to grow plants. At 13 ft by 11 ft with a pergola across the front, it occupies the same visual space as a summerhouse, and the cedar-and-glazing combination is designed to be looked at rather than tucked behind a hedge. If the greenhouse is going somewhere prominent, that matters as much as the growing specification.
The growing specification is nonetheless serious. Cedar framing insulates better than aluminum and does not conduct cold out of the structure at every bar, which shows up as a warmer night-time minimum for the same conditions. A powered exhaust fan and an opening window handle the summer heat problem, hose hook-ups let you plumb irrigation without running pipe through a door gap, and the PowerPort provides a proper indoor outlet for heat mats, propagators or lighting. Staging shelves come with the kit, so the interior is usable from day one.
Timber also has a practical advantage that metal frames lack: you can screw into it anywhere. Extra shelving, hooks, trellis, a potting bench, a thermometer bracket, all of it fixes straight to the frame without special channel connectors. What you pay for that is weight and time. This is the longest build here by a wide margin, it needs a large level site with delivery access, and cedar benefits from resealing every few years if you want the colour to stay even rather than weathering to grey.
Bottom line: overkill for seed starting, exactly right if you want a permanent, powered, cedar-framed growing space that also works as an outdoor room.
- Footprint: 13 ft x 11 ft walk-in
- Frame: cedar wood with polycarbonate glazing
- Feature: attached pergola section at the entrance
- Ventilation: powered exhaust fan plus opening window
- Utilities: PowerPort electrical outlet and hose hook-ups
- Included: staging shelves
- Use: year-round outdoor gardening
This is for the gardener building a destination rather than a shelter. The pergola front, the cedar framing and the scale all point at a structure meant to be part of the garden design, somewhere you sit as well as somewhere you pot on.
It suits anyone planning to grow year-round, because the built-in power access and the insulating timber frame make winter use practical rather than theoretical. It is the wrong choice for a small yard, for a renter, or for anyone who wants to be growing next weekend, since site preparation and assembly are both substantial projects.
Prepare the ground properly before delivery. A structure this size wants a level, well-drained base such as a compacted gravel pad, a paver ring or a timber perimeter, and it needs clearance on every side so you can reach the glazing and the cedar for maintenance.
Check delivery access first, because the packages are heavy and long. Plan drainage at the eaves so runoff does not sit against the timber, keep mulch and soil away from the base rail so it can dry after rain, and orient the pergola front toward the aspect you will actually want to sit in during the afternoon.
How to Choose a Polycarbonate Greenhouse: What Actually Matters
Greenhouse listings love to lead with square footage and a hero photo taken on a cloudless afternoon. Those tell you almost nothing about how the structure performs in a January gale. The six criteria below are the ones that decide whether your plants make it to spring, and they are the ones we weighted when ordering this guide.
Panel Thickness and Twin-Wall Construction

Polycarbonate comes in two shapes that matter here. Single-wall corrugated sheet is a flat, ribbed plastic that lets light through and stops rain, but it insulates about as well as a window pane. Twin-wall, sometimes labelled double-wall or hollow-core, sandwiches an air gap between two thin skins, and that trapped air is what keeps your night temperatures several degrees above outside. Every walk-in structure in this guide uses twin-wall panels on the roof and walls, which is the baseline we would insist on for a greenhouse that has to work in shoulder season.
Thickness is quoted in millimetres, and 4mm is the standard on the affordable aluminum kits. It is genuinely usable: the SYLVIERA and Fly By Yan houses both run 4mm twin-wall, and that is enough to keep frost off seedlings and stretch your growing calendar by weeks on both ends. Step up to 6mm, 8mm, or 10mm and the air channels get deeper, insulation improves noticeably, and the panel gets stiff enough to resist flexing in wind. Premium cedar kits like the Backyard Discovery models use thicker, more rigid glazing precisely because the frame can carry the extra weight.
One detail almost nobody mentions on the box: quality polycarbonate has a UV-protective coating on one face only, and it has to point outward. Install a panel upside down and it will yellow and go brittle within a couple of seasons. Look for a printed film or a marked edge during assembly, and do not peel the protective wrap until the panel is seated. Light transmission on clear twin-wall lands in the low-to-mid eighties as a percentage, and because the light arrives diffused rather than as a hard beam, you get fewer scorch marks on tender leaves than you would under glass.
Frame Material: Aluminum, Steel, or Cedar

Aluminum dominates this category and for good reason. It never rusts, it is light enough that two people can raise a wall section, and extruded channels let panels slide into place instead of being screwed through. The trade-off is thermal bridging: bare metal conducts heat straight out of the structure, and thin-gauge aluminum can twist if the kit is not braced or anchored properly. The YITAHOME, HOWE, Jiliusure, SYLVIERA, and Fly By Yan houses here all sit on aluminum, and the differences between them come down to profile thickness and how many cross braces the design includes.
Galvanized steel shows up mostly on hoop-style and hybrid frames. It is stronger per section than aluminum and handles snow load well, but it adds weight, and any scratch through the coating becomes a rust seed. Cedar is the third route, and it is what Backyard Discovery uses on the Willow and Bellerose XL. Cedar is naturally rot and insect resistant, it does not conduct cold the way metal does, and it takes screws for shelving anywhere you want them. It is also the heaviest option, the slowest to build, and it benefits from a coat of sealer every few years if you care about the colour staying even.
If your yard sees hard freezes and heavy wet snow, the frame is where you should spend. If you mostly need frost protection and a longer season, a well-braced aluminum kit anchored correctly will serve you fine. For a wider look at what holds up outdoors season after season, our notes on the best tarp materials cover a lot of the same weathering logic in a cheaper package.
Wind and Snow Resistance Starts at the Anchors
Almost every greenhouse failure story starts the same way: the kit went up on bare soil, the ground stakes went in at an angle, and the first real storm turned the whole thing into a kite. A polycarbonate greenhouse is light, it presents a large flat face to the wind, and it needs to be tied to something that is not going anywhere. Ground spikes into firm soil are the minimum. Bolting the base rail to a pressure-treated timber perimeter, a paver ring, or a concrete pad is far better, and every manufacturer here supplies base-mounting holes for exactly that reason.
Snow is the other load, and it works differently. A steep roof pitch sheds snow on its own, a shallow one collects it, and wet snow is heavy enough to bow a 4mm panel and pop it out of its channel. If you live somewhere that gets serious accumulation, either brush the roof after every storm or choose a design with a pronounced ridge and extra roof bracing. The HOWE pavilion-style house and the cedar Backyard Discovery kits both carry more structural depth in the roof than the budget models, which is exactly what you are paying for.
Two smaller habits pay off here too. Keep the door latched when you are not inside, because an open door turns the greenhouse into a wind scoop and lifts the roof from within. And check every panel clip in autumn: a single loose clip lets wind get under a sheet, and once one panel goes the neighbours follow.
Ventilation and Heat Management

People buy greenhouses to trap heat and then lose a whole crop to it in July. A sealed twin-wall box in full sun can climb thirty degrees above ambient in an afternoon, which cooks roots and stops fruit setting. The traditional rule of thumb is that opening vent area should reach roughly fifteen to twenty percent of the floor area, and most budget kits ship well under that with a single roof vent.
That is why vent count is one of the clearest quality signals in this lineup. The HOWE 16 ft x 12 ft carries four vent windows plus double doors, the Jiliusure 8 ft x 10 ft has two roof vents, and the smaller houses come with one. More vents mean better cross flow and a lower peak temperature without any powered help. Automatic vent openers that use a wax cylinder cost very little, need no electricity, and are the single best upgrade you can bolt onto a budget greenhouse.
The cedar Backyard Discovery kits take a different route and include a powered exhaust fan plus an electrical PowerPort, so you can run the fan, a heat mat, or grow lights without trailing an extension lead through the door. If you plan to garden through winter as well as summer, that built-in power access matters more than most buyers expect. Composting close to the greenhouse also helps stabilise things, and an insulated bin like the ones in our outdoor compost bin guide gives you a warm soil amendment right where you need it.
Size, Headroom, and Door Style
Footprint is only half the size question. Ridge height decides whether you can stand up comfortably, and side wall height decides whether you can put a bench along the edge and still grow anything on it. A house with 5 ft side walls and a 7.5 ft ridge, like the HOWE 8 ft x 10 ft, gives you usable shelf space right up to the glazing. A low-walled house of the same footprint forces everything into the middle aisle.
On footprint itself, buy larger than your current plant list suggests. Every experienced grower says the same thing: the greenhouse fills up in the first season. A 6 ft x 4 ft house handles seed starting, hardening off, and a few container crops. A 6 ft x 6 ft or 9 ft x 6 ft gives you a bench down one side plus floor space for tall pots. Anything from 8 ft x 10 ft upward starts behaving like a real growing room, with room for staging on both sides and an aisle you can kneel in.
Doors matter more than the spec sheets imply. Sliding doors, as on the YITAHOME, do not catch the wind and do not need swing clearance, which is ideal on a narrow side path. Hinged double doors, as on both HOWE models, open wide enough to wheel a barrow or a full potting tray through and give you a big ventilation opening on hot days. Whichever style you choose, check that the door locks, because an unlatched door is the most common cause of storm damage.
Assembly Systems and What the Build Really Takes
No polycarbonate greenhouse is a one-hour job. Budget on a full weekend for anything above 6 ft x 6 ft, plan for two people, and level the ground before the box is opened. Uneven ground is the reason panels will not seat and doors will not close, and no amount of forcing fixes it afterwards.
Assembly systems do differ in a way you can feel. Slide-in panel designs, which Fly By Yan builds its kits around, let you drop each sheet into an extruded channel rather than aligning dozens of separate clips, and that removes most of the fiddly work. Clip-and-screw systems are cheaper to manufacture and give you more small parts to lose in the grass. Cedar kits sit at the other end entirely: pre-cut lumber, more hardware, a longer build, and a structure that feels like a shed when it is done.
Practical tips that save an afternoon: sort and count every bag of hardware before you start, keep the protective film on the panels until the last moment so they do not scuff, and dry-fit the base frame square before you anchor anything. A square base makes every later step fall into place.
| Model | Frame | Footprint | Ventilation | Stands Out For |
|---|---|---|---|---|
| Backyard Discovery Willow | Cedar wood | 9 ft x 6 ft | Exhaust fan plus windows | Highest rated build in the guide |
| YITAHOME 12 ft x 6 ft | Aluminum | 12 ft x 6 ft | Roof vent window | Long, narrow runs along a fence |
| SYLVIERA 6 ft x 4 ft | Aluminum | 6 ft x 4 ft | Vented roof window | Entry-level seed starting |
| HOWE 16 ft x 12 ft | Aluminum | 16 ft x 12 ft | Four vent windows | Largest footprint and headroom |
| HOWE 8 ft x 10 ft | Aluminum | 8 ft x 10 ft | Two vents plus double doors | Raised side walls for benching |
| Jiliusure 8 ft x 10 ft | Aluminum | 8 ft x 10 ft | Two roof vents | Integrated rain gutters |
| Fly By Yan 6 ft x 6 ft | Aluminum | 6 ft x 6 ft | Adjustable roof vent | Slide-in panel assembly |
| Backyard Discovery Bellerose XL | Cedar wood | 13 ft x 11 ft | Exhaust fan plus window | Pergola-fronted garden room |
Why You Should Trust Us
We build these guides the same way every time. We start by pulling the current Amazon listings for the category, then filter hard on verified customer ratings so that nothing makes the cut on marketing copy alone. From there we read the specification sheets line by line, compare panel construction, frame gauge, vent count, wall height, and anchoring hardware, and set aside anything that is a colour variant or a repackaged version of a model already on the list. What survives is a lineup where every entry earns its place by being meaningfully different from the others.
We do not claim to have assembled all 8 of these greenhouses in a back garden, and we think you should be sceptical of any site that does. What we do is read the aggregate of real owner feedback, cross-check the manufacturer specifications against what buyers report about panel fit, door alignment, and storm performance, and weight our ranking toward the structures with the most consistent record. Prices and stock move constantly on Amazon, so always confirm current details on the product page before you commit. You can browse the rest of our outdoor coverage in the patio, lawn and garden section.
Final Thoughts
For best overall, the Backyard Discovery Willow 9 ft x 6 ft Cedar and Polycarbonate Walk-In Greenhouse Kit is the one we would put in our own yard. The cedar frame insulates better than bare aluminum, the exhaust fan and opening windows solve the summer heat problem out of the box, the hose hook-ups and PowerPort mean you are not running services in later, and it carries the strongest owner rating of anything here. It is the heaviest build on the list and it asks for a weekend, but it is the kit most likely to still be standing and square in ten years.
For best value, the SYLVIERA 6 ft x 4 ft Polycarbonate Greenhouse with Hygrometer is remarkably hard to beat. You get a proper aluminum frame, 4mm twin-wall panels, a lockable door, a vented roof window, ground spikes, and a hygrometer thrown in, which is the whole toolkit for extending a season on a small patio or side yard. It has drawn far more owner feedback than any other structure in this guide, and the consensus is that it does exactly what a starter greenhouse should. If your only goal is protecting seedlings and pushing tomatoes a month further into autumn, start here.
Beyond those two, pick by use case. For the largest growing space, the HOWE 16 ft x 12 ft pavilion-style house gives you four vents, lockable double doors, and enough headroom to work standing up all day. For a narrow strip along a fence, the YITAHOME 12 ft x 6 ft with sliding doors uses the space no other shape can. For rainwater capture, the Jiliusure 8 ft x 10 ft ships with gutters already fitted. For the fastest build, the Fly By Yan 6 ft x 6 ft and its slide-in panels will have you finished in an afternoon. And if the greenhouse is meant to be a feature rather than a utility, the Backyard Discovery Bellerose XL 13 ft x 11 ft with its pergola front is a garden room first and a greenhouse second. Once the structure is up, our guide to the best indoor plants is a good source of ideas for the shelf space you are about to gain, and you can find more buying guides like this one in our articles archive.
Frequently Asked Questions
How thick should the panels be on a polycarbonate greenhouse in 2026?
For frost protection and season extension, 4mm twin-wall polycarbonate is the practical minimum and is what most affordable aluminum kits use. If you intend to grow through a cold winter, or you live where wet snow settles on the roof, look for 6mm or thicker, because the deeper air channel insulates better and the sheet resists bowing under load. Single-wall corrugated polycarbonate is fine for a lean-to or a cold frame but it will not hold overnight heat the way twin-wall does.
Is a polycarbonate greenhouse better than glass?
For most home gardeners, yes. Polycarbonate is dramatically more impact resistant than horticultural glass, so hail, a stray ball, or a falling branch does not turn into a shattered pane and a cleanup job. It is far lighter, which makes assembly and repositioning realistic for two people. Twin-wall polycarbonate also insulates better than single glazing and diffuses light, which reduces leaf scorch. Glass still wins on clarity and it will not yellow over decades, but it costs more, weighs more, and is genuinely dangerous when it breaks.
Will a polycarbonate greenhouse survive strong wind?
It will if it is anchored properly, and it will not if it is not. The frame and panels are rarely the weak link. What fails is the connection to the ground. Use every ground spike supplied, and if you can, bolt the base rail to a timber perimeter, paver ring, or concrete pad instead of relying on soil alone. Keep the door latched, check panel clips before storm season, and site the greenhouse where a fence, hedge, or wall breaks the prevailing wind rather than in the middle of an open lawn.
What size polycarbonate greenhouse should a beginner buy?
A 6 ft x 4 ft house is enough for seed starting, hardening off transplants, and overwintering a few tender pots, and it fits on a small patio. If you have the space and the budget, step up to 6 ft x 6 ft or larger, because almost everyone fills the greenhouse in the first season and then wishes they had gone bigger. Measure the site including door swing and a working path around the outside, and remember that the structure needs level ground under its whole footprint.
How do I stop a greenhouse from overheating in summer?
Ventilation first, shading second, water third. Open every roof vent and the door on hot days, and add an automatic wax-cylinder vent opener so the greenhouse looks after itself while you are at work. If peak temperatures are still too high, fit shade cloth over the sunny face or apply a temporary shading wash. Damping down the floor with water in the morning raises humidity and cools the air as it evaporates, and a garden sprayer makes that a two-minute job. Our guide to the best pump sprayers covers models with enough reach to do it without stepping over your beds.






Write Your Review
No reviews yet. Be the first to share your experience!